
Many users want to ensure that once a successful backup has taken place, the files that have been backed up should be deleted. MSP360 Backup has an extremely easy to use Wizard that allows you to do this using a Windows Batch file. Here are the steps that have to be taken
Table of Contents
Step 1 - Create and Test your Batch File
Create a batch file to delete the files you want. This is a simple text file with the extension .bat instead of .txt. A batch file consists of a number of DOS commands that are executed in sequence. There are a number of web resources available that explain the creation of batch files. In a trial folder on your PC, copy a few files that have the same extensions as the files you will be backing up. Create a batch file that deletes these file (when run by you or a program such as MSP360 Backup Wizard). Test that your batch works correctly by running it and checking that the target files are deleted.
For a simple example, consider the following –
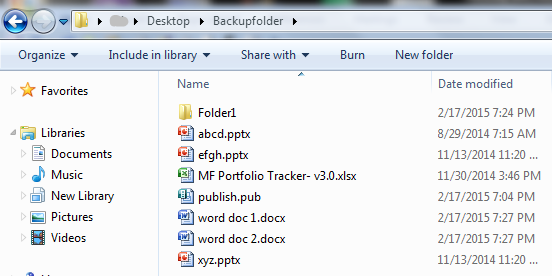
You have a backup folder on your desktop called – “backupfolder”. This contains the various files you want backed up. It also has a folder called “Folder1” that has subfolders which also have files that are to be backed up. Let us say that the contents of your backupfolder would look this –
If you want to back this folder up and then delete all the files and the folders in it after the backup is successful, you would write a batch file to do so.
Open the notepad, and type the following commands in sequence, one to a line –
| Command | Explanation |
| @echo ON | display or echo the result of the command on screen |
| cd /d c:\users\user1\Desktop\backupfolder | change the working directory to the backupfolder directory. Your path to the directory may be different depending on where you have created your backup folder |
| del *.* /Q | delete all files in the current directory. and /Q means delete in Quiet mode. Do not ask for confirmation. |
| rmdir Folder1 /S/Q | Delete the folder called Folder1. /S means delete sub-directories as well and /Q means delete in Quiet mode. Do not ask for confirmation. |
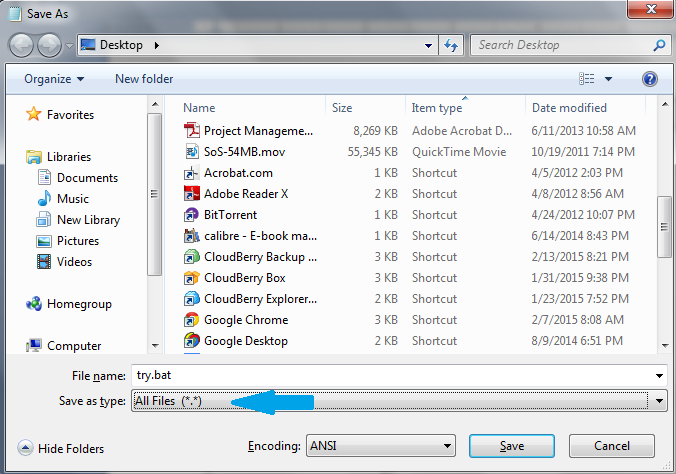
To save the batch file, select “File | Save As” in notepad. In Save as type (see blue arrow) select all files and then type a file name and the extension .bat manually. In the example here, we have used try.bat
Subsequently, we will give MSP360 Backup the location of the try.bat file and instruct it to run this file after a successful backup.
In the present case, the batch file to delete all files and folders from the backupfolder would look like the listing below.

Script:
@echo on
cd /d C:\users\user1\Desktop\backupfolder
del *.* /Q
rmdir Folder1 /S/Q
Step 2 - Set up MSP360 Backup Correctly
Navigate to the ‘Pre / Post Action’ screen in MSP360 Backup.
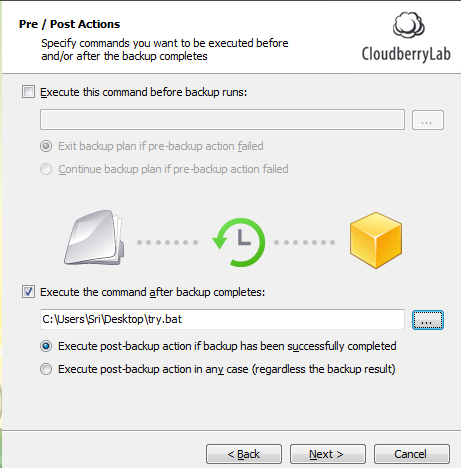
This page lets you specify the actions that will occur before and after your backups. Here you can select your batch file that will run after a successful backup.
Browse to select the batch file you have created and tested previously. Be sure that the paths in the batch file are set correctly.
Once the backup runs successfully, MSP360 Backup would run the batch file and which would delete all files and folders in the specified folder.
Things to be careful about –
- Be careful about the files you keep in the specified backup folder. All files in the target folder will be deleted once the Batch file runs
- Do not keep the Batch file itself in the backup folder
- If you have specified any advanced filters while creating your backup plan, you will have to build your batch file with greater care. A simple “del *.*” will delete all files whereas you may have backed up only a few of your files using the advanced filters options
After the backup succeeded, you will have your files on the cloud and no longer those files on your local storage. You can always view the history of your backups plans on the History tab:
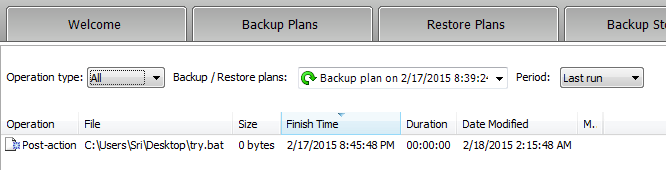
This indicates that the backup and batch file based actions have gone off correctly. If there were a problem and the actions of the batch file were not taken correctly, this would be clearly indicated on the history page.
Conclusion
This post explains how you can optimize your storage by keeping files on the cloud only if there is no need to have them on a local storage after a successful backup.