

In this post, you will learn about S3 Select, a feature announced by AWS in 2017 to allow you to retrieve subsets of data from an object on S3. We will discuss why you would want to use S3 Select, then walk through a simple use case of how to use S3 Select with Boto 3, the AWS SDK for Python.
Table of Contents
What is S3 Select and when should you use it?
S3 Select is a feature of S3 that lets you specify targeted portions of an S3 object to retrieve and return to you rather than returning the entire contents of the object. You can use some basic SQL expressions to select certain columns and filter for particular records in your structured file.
S3 Select is a great fit for when you have a large amount of structured data but only a small portion of the object is relevant to your current needs. It may be impractical to retrieve the entire object on S3 before filtering down to the information that the end user actually cares about. This can be particularly useful in two scenarios:
- In browser applications: Showing a filtered view of a large dataset to an end user
- In large data processing: Pre-filtering many S3 objects before performing additional analysis with tools like Spark or Presto.
To use S3 Select, your data must be structured in either CSV or JSON format with UTF-8 encoding. You can compress your files with GZIP or BZIP2 compression before sending to S3 to save on object size.
In the next section, we will do a walkthrough to see how S3 Select can be useful for end users in a browser application.


Walkthrough: How to use S3 Select
Talking about S3 Select in the abstract is fine, but sometimes it takes an example to see the real benefits. In this section, we’ll go through an example of how you might use S3 Select to filter large amounts of data for displaying to end users in an application.
We will use a dataset from Kaggle that includes all police calls in San Francisco from 2001 to 2018. This is a CSV dataset with over 2 million rows and a file size of 741MB. Each row includes information such as the date and time of the incident, the latitude and longitude coordinates, the category and description of the incident (e.g., a category of “Assault” and a description of “Battery”), and the resolution of the incident.
Imagine we’re building a web application where we want to show users crime statistics on top of a map of San Francisco. You want to allow users to filter the statistics based on time range, certain types of incidents (Assault vs. Theft), or geographical location. It would be infeasible to download the entire 741MB file to the user’s browser to do filtering on the client. In the steps below, we’ll show how to use S3 Select to implement filtering in S3 to save time and bandwidth in displaying information to users.
Upload an example CSV file to S3
In this section, we will upload the San Francisco Police Calls dataset to your own S3 bucket. Go through these steps if you want to follow along with the code examples in the following section.
- First, download the change-notice-police-department-incidents.csv file from Kaggle’s SF Police Calls dataset.
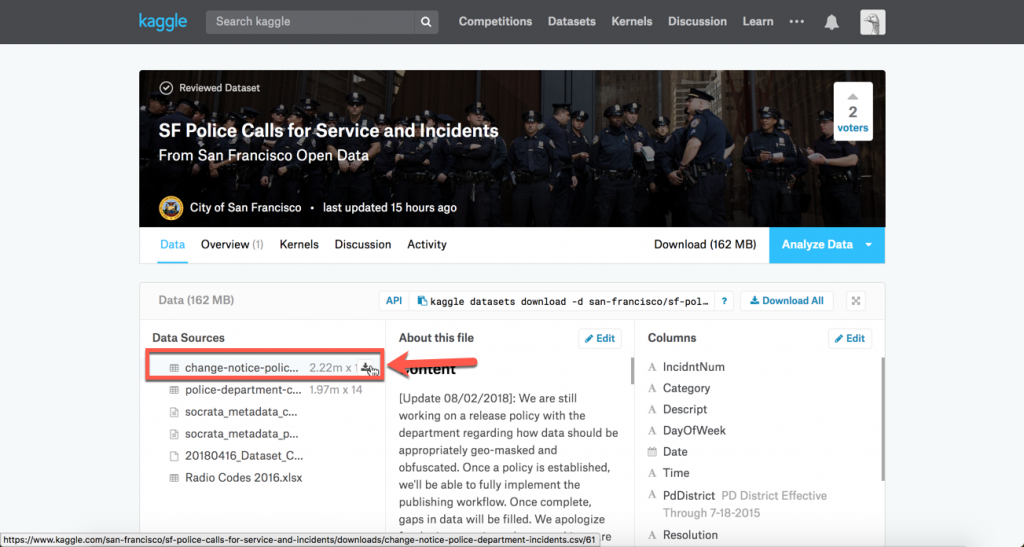
- After downloading, unzip the file in your Downloads folder.
- Finally, upload the extracted change-notice-police-department-incidents.csv file to your S3 bucket. You can do this using CloudBerry Explorer for Amazon S3 or via the AWS CLI.
Once your file is uploaded, you can move on to the next steps. Make sure you have the bucket name and key name of the file available so you can use it in the example script.
Use Boto 3 & S3 Select to filter the file on S3
In this section, we will use the AWS SDK to perform an S3 Select operation on our dataset. This example will use Boto 3, which is the AWS SDK for Python. However, you can use any AWS SDK you want, such as the AWS SDK for Javascript if using this in the browser.
To perform an S3 Select call, we use the select_object_content() method on the S3 client. When making this call, there are four main pieces of information you’ll need to include:
- The object you’re operating on, as indicated by the BucketName and Key parameters;
- The SQL expression you want to perform, using the Expression parameter;
- The format of the file on S3, given by the InputSerialization parameter, and
- The format of the results you want, given by the OutputSerialization parameter.
Imagine that our user wants to display all Assaults in the Mission on New Year’s Eve, 2004. Save the following script to a file called s3_select.py.
import boto3


client = boto3.client('s3')

resp = client.select_object_content(
    Bucket='cloudberry-examples', # Put your own bucket name here.
    Key='s3-select/change-notice-police-department-incidents.csv', # Put your own key name here.
    Expression="SELECT * FROM s3object s WHERE s.Category = 'ASSAULT' and s.PdDistrict = 'MISSION' and s.\"Date\" BETWEEN '2004-12-31' AND '2005-01-01'",
    ExpressionType='SQL',
    InputSerialization={
        "CSV": {
            'FileHeaderInfo': 'USE',
        },
    },
    OutputSerialization={
        'JSON': {}
    },
)

for event in resp['Payload']:
    if 'Records' in event:
        print(event['Records']['Payload'].decode('utf-8'))
    elif 'Stats' in event:
        print(event['Stats'])
Let’s walk through the different pieces we said we needed:
- We specified the Bucket and Key parameters to identify the S3 object on which to operate.
- In the Expression parameter, we sent a SQL expression with the given filters we want, including the Category of “Assault”, the District of “Mission”, and the time range.
- In the InputSerialization parameter, we indicate that our file is in a CSV format. Further, we state that we should use the file headers from the first line of the file. These headers are used to identify the columns in our SQL expression.
- Finally, in the OutputSerialization, we indicate that we want our results to be in JSON format which is easy for us to manipulate.
At the end of the script, we print out each of the returned items as well as the summary statistics from S3.
After you save the file, you can run it in your terminal by entering python s3_select.py. You will need the Boto 3 Python library installed.
You should see the following output after running the command:
$ python s3_select.py
{"IncidntNum":"050450449","Category":"ASSAULT","Descript":
"THREATS AGAINST LIFE","DayOfWeek":"Friday","Date":"2004-12-31T00:00:00",
"Time":"08:00","PdDistrict":"MISSION","Resolution":"NONE","Address":"16TH ST / MISSION ST","X"
:"-122.419671780303","Y":"37.7650501214714","Location"
:"{'longitude': '-122.419671780303', 'human_address'
: '{\"address\":\"\",\"city\":\"\",\"state\":\"\",\"zip\":\"\"}', 'needs_recoding'
: False, 'latitude': '37.7650501214714'}","PdId":"5045044919057\r"}

{"IncidntNum":"050008684","Category":"ASSAULT","Descript":"THREATS AGAINST LIFE","DayOfWeek"
:"Friday","Date":"2004-12-31T00:00:00","Time":"18:00","PdDistrict":"MISSION","Resolution"
:"NONE","Address":"900 Block of ALABAMA ST","X":"-122.411278054259","Y":"37.7566750455245"
,"Location":"{'longitude': '-122.411278054259', 'human_address'
: '{\"address\":\"\",\"city\":\"\",\"state\":\"\",\"zip\":\"\"}', 'needs_recoding'
: False, 'latitude': '37.7566750455245'}","PdId":"5000868419057\r"}

{"IncidntNum":"041476214","Category":"ASSAULT","Descript"
:"THREATS AGAINST LIFE","DayOfWeek":"Friday","Date"
:"2004-12-31T00:00:00","Time":"04:15","PdDistrict"
:"MISSION","Resolution":"NONE","Address"
:"800 Block of VALENCIA ST","X"
:"-122.421380986073","Y":"37.7589148884581","Location"
:"{'longitude': '-122.421380986073', 'human_address'
: '{\"address\":\"\",\"city\":\"\",\"state\":\"\",\"zip\":\"\"}', 'needs_recoding'
: False, 'latitude': '37.7589148884581'}","PdId":"4147621419057\r"}

{"IncidntNum":"041477278","Category"
:"ASSAULT","Descript":"BATTERY","DayOfWeek":"Friday","Date"
:"2004-12-31T00:00:00","Time":"11:43","PdDistrict":"MISSION","Resolution"
:"NONE","Address":"2700 Block of 22ND ST","X":"-122.409908449792","Y"
:"37.7560248782427","Location":"{'longitude': '-122.409908449792', 'human_address'
: '{\"address\":\"\",\"city\":\"\",\"state\":\"\",\"zip\":\"\"}', 'needs_recoding'
: False, 'latitude': '37.7560248782427'}","PdId":"4147727804134\r"}

{"IncidntNum":"050004143","Category":"ASSAULT","Descript"
:"INFLICT INJURY ON COHABITEE","DayOfWeek":"Friday","Date":"2004-12-31T00:00:00","Time"
:"19:00","PdDistrict":"MISSION","Resolution":"NONE","Address":"0 Block of LUCKY ST","X"
:"-122.413509818711","Y":"37.7517329980946","Location"
:"{'longitude': '-122.413509818711', 'human_address'
: '{\"address\":\"\",\"city\":\"\",\"state\":\"\",\"zip\":\"\"}', 'needs_recoding'
: False, 'latitude': '37.7517329980946'}","PdId":"5000414315040\r"}

{'Details': {'BytesScanned': 777628656, 'BytesProcessed': 777628656, 'BytesReturned': 2406}}
What is Glacier Select and when should you use it?
Amazon S3 Glacier is a service provided by AWS for long-term data storage and archiving. It is used for data that is infrequently accessed but a company may not want to delete, either for legal reasons or long-term redundancy. The storage costs are cheaper than S3 but it is much slower to retrieve the data, ranging from minutes to hours.
Like S3 Select, Glacier Select allows you to use SQL expressions to pull a subset of data from a larger file. Glacier Select will store the results of your query in a file on S3 that can be used for quick and easy access. The job to select your data from a file will be done at normal Glacier speeds -- minutes to hours -- but you won’t have to restore the entire file from Glacier. Because Glacier is often used for storing large amounts of data, this can save you significant time and money on retrieval.
Making a Glacier Select call is similar to making an S3 Select call. You’ll use the InitiateJob API call for Glacier to start a retrieval job, and you’ll include your Glacier Select options in the SelectParameters portion of the call. You’ll specify the data you want to select and the output location for the results, and Glacier will respond with a JobID. You can use this JobID to check the job status. Once the job is complete, you can view your results.
Conclusion
The advent of cloud computing has led to an explosion in the use of data to better understand business performance and user behavior. The combination of instantly-available compute via services like EC2 plus infinitely-scalable storage via S3 means that it’s easier than ever to store and analyze larger and larger amounts of data.
But this revolution comes at a cost. As the size of our stored data continues to grow, it becomes more and more expensive -- both in terms of processing time and in bandwidth costs -- to analyze and find insights in our data.
S3 Select and Glacier Select are exciting new features that open up a number of possibilities for data processing. As shown in this post, you can use S3 Select to allow filtering on large, structured datasets without setting up a full database and API in front of it. You can also use S3 Select to significantly reduce upfront data transfer time and expense when using big data tools like Spark or Presto to analyze data on S3. Finally, if you have sent data to Glacier for long-term storage, you can use Glacier Select to retrieve the elements you actually need without restoring full objects.
- Introduction to Amazon S3 access tools
- Writing IAM policies
- Mastering Amazon S3 identities
